

/zBlackWhite/images1/image%20camera.jpg)
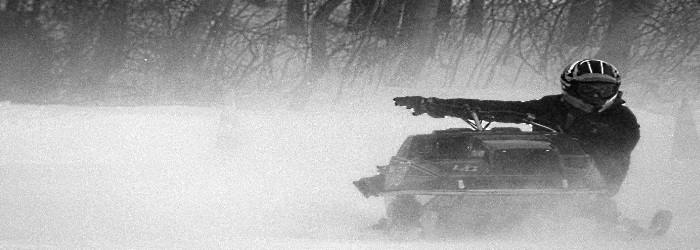
I was away last weekend at another civil war re-enactment camping weekend event, where I ran into a man we only know as the “Tintype Photographer”. He travels from event to event documenting the re-enactors as they play out everyday life of the 19th century soldiers and their families. I tracked him down and he was generous enough to answer some of my questions and he allowed me to photograph the tintypes he produced of the weekend. One of the images he captured was of me, while I was washing dishes and my son Andrew was “helping” me. He’s been photographing civil war events for more than 12 years now, but never gives out his name. He prefers to remain anonymous, free to carry out what he calls his “hobby”.
Some hobby! He started out using an authentic antique camera he re-built from three different ones he picked up on an auctions site, then went on to build his own, which is what he currently uses to capture his tintypes, or wet plate images. The initial investment alone would have been well into the thousands of dollars, let alone the darkroom wagon he carts around with him to every weekend. He even uses whatever local water source is available, lakes or streams, to duplicate as closely as possible what the original tintypes would have looked like.
After returning to modern civilization I wanted to look into tintype photography a little deeper and discovered that there has been a revival of the old-fashioned hand developed photographs. Beautiful imagery of modern portrait subjects brought to life, in a single one of a kind image. Deep blacks produced by a black enamel coated tin. Just go to YouTube and do a search on “Wet Plate Photography”, you’ll come up with some amazing videos on modern portrait studios using tintypes.
Just for fun, I included this guide on how to produce a tintype that I found while doing my research. This gives you a small idea how complex but rewarding the and satisfying the tintype process is.
Have a great week, Lakeview. As always, if you have questions or comments feel free to look me up!
HOW TO CREATE A TINTYPE IMAGE:
Cover Plate in Collodian – The first step is to cover the glass plate in collodian which is a special chemical. This can be done in bright light.
Submerse in Silver Nitrate Bath – The silver nitrate is another chemical solution that is used to make the plate light sensitive.
Insert into a Plate Holder – Once the plate is removed from the silver nitrate bath it is very sensitive to light so a light tight plate holder must be used to transport the plate to the camera.
Attach Plate Holder to Camera – The plate holder attaches to the camera and holds the plate in place while the image is being exposed. Remove Dark Slide – The dark slide reveals the plate inside the camera so that the image is ready to be made.
Remove Lens Cap – Removing the lens cap is equivalent to pressing the shutter button. There is no aperture, and the shutter speed is simply how long you leave the lens cap off, which will typically be several seconds.
Replace Lens Cap and Dark Slide, and Remove Plate Holder – Putting the lens cap back on ends your exposure. Putting the dark slide back in makes your plate holder light tight again. Now you may remove the plate holder from the camera and take it to the dark room.
Place Plate in Bin and Add Developer – In a dark room, or room with a special red light, you may remove the plate from the holder and place it into a bin with the right developer chemicals. The image will sit in the bin for several seconds before it needs to be stopped.
Use Water to Stop Development – Once the darkest details start to show, stop the development by adding water and rinsing the plate.
Fix the Image – Using another bin and fixing chemicals, fix the image so that the image will keep its proper exposure. This can be done in light.
Let the Image Dry – The image must dry for a while. It is fragile during this state so caution must be taken.
Add Varnish – Without varnish, the image is very fragile and can easily be scratched and permanently marked on. The varnish not only protects the image, but creates a more pleasing contrast and glossy look.